|
| You'd like to install a LCD display and an interactive entertainment system in your car like those rappers in video clips ? No problem ;-) With a few bucks you can turn your jalopy into a real trendy ride and act like 50Cent while driving in your hood with your system up ! Yes, you can do it ! I've written this small but concise step to step tutorial in order to turn your ride into a really nice place to have fun ! |
|
| |
| Introduction |
Yes, of course you need some stuff to begin your installation. The goal of my tutorial is to remain the whole costs as low as possible. We won't include the price for the computer/PDA but will include the price for a low budget 12V to 220V converter that I bought in a do it yourself supermarket.
First you need to determine where and how you are going to put the computer and the display. I decided to put it on the top of the middle console and to put the components in the passengers trunk on the right side. It's best to put in their because my car has air conditioning, which will cool down the computer. Perhaps you'll also have small holes in your trunk for the AC. Thanks to theses holes we'll be able to pass our cables through. The main principle that I wanted to follow: the installation had to be as discrete as possible and each component had to be easily removable. Another important principle : no drill ! Of course on my car I had the chance that I had nothing to drill, but perhaps you will need to do this in your ride. |
 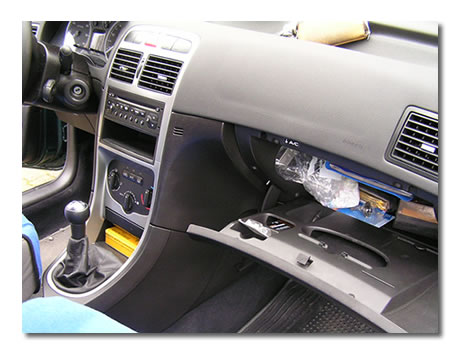 |
| The interior of a Peugeot 307. Now that we found the place we can now begin to install the cables. |
| |
Step 1 : Cables and wires |
| |
| The first step before pluging something : draw a quick schema of how and where your cables are going to be led through your car inside. Once you have determined where they should go through you need to count how many wires you will need. Here's a quick overview list of the cables you will need. |
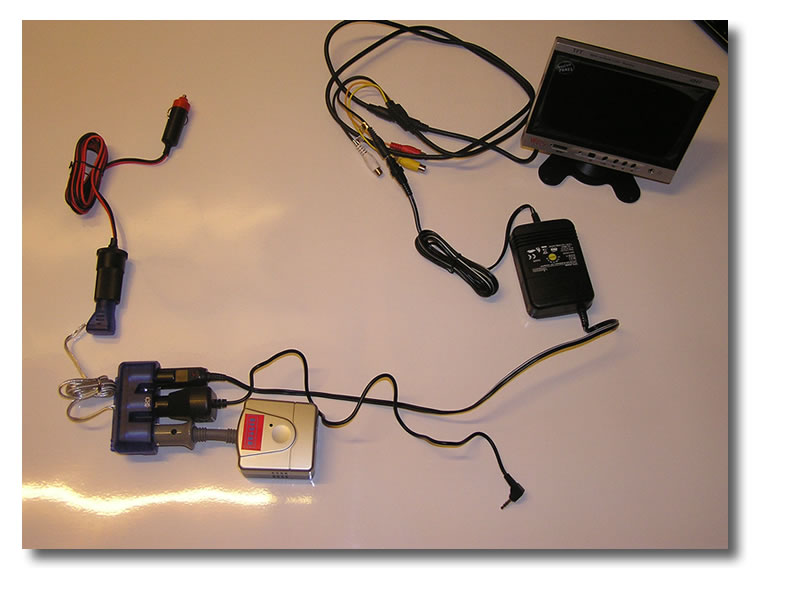 |
- 7' LCD Display (about € 100)
- 12V convertor ( about € 20) (optional)
- FM Transmitter ( about € 15)
- an adaptor which converts the car lighter socket to 3x 12V DC output sockets (about € 10)
- a long 12V cable for car lighter (Link)
So we have our whole installation for about € 145 !
I recommend following websites to get the cheapest components :
If you want to lower the cost to have a look to get a real cheap ( the quality is good) 7' LCD display http://www.twinguo.com/
For the wires and cables : http://www.conrad.com/
|
Notice : be careful when purchasing a 12V to 220V convertor ! Some models can harm your system or even your computer. I would say don't try to spare too much money on this part, but try to invest in a good quality convertor : http://www1.conrad.de/template=PCAT_AREA_S_BROWSE&direkt_aufriss_area=SHOP_AREA_17449
Don't hesitate to ask for help in your favorite electronic shop. |
|
| Step 2 : Cables and wires |
| |
|
We now need to remove the plastic part under the radio that was hiding the interior of the middle console in order to pull a cable directly to the car lighter: it depends where yours is. Mine was near the gear that's why it was more complicated |
| Step 3 : Installation |
|
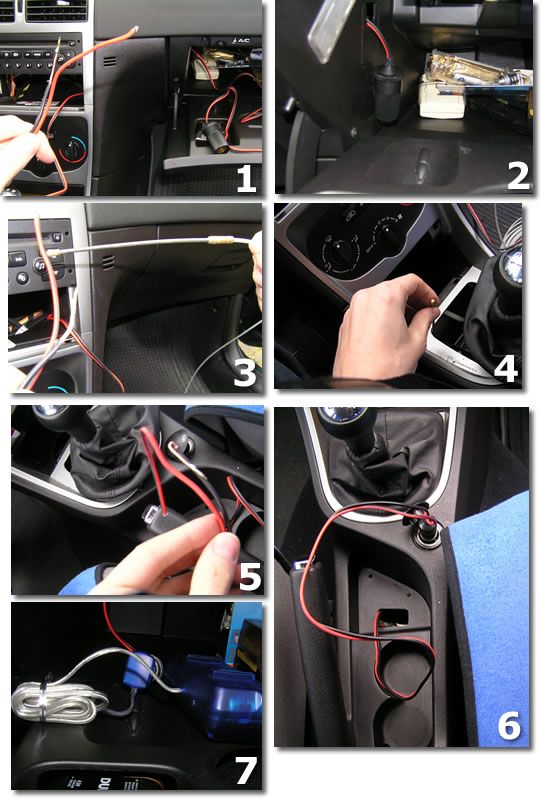
1 / We need to pass the wires outside of the passenger's box
2/ Here is the 12V car lighter cable extension
3/ With a hard plastic cable used by electricians we are going to stick the cable in order to pass it through (to be more precise :behind) the middle console
4/5/6 After a while we finally have passed the 12V extension cable through the whole middle console. No cables are visible !
7/ We can now connect the 3x 12V socket adaptor |
|
8 / Just to check if everything is ok : the iBook G4 (of course a Mac Mini would be better !) can be easily placed in the passenger's box
9/10/11 Now we need to install the yellow video signal cable signal. In order to avoid to drill we are going to let this cable go straight out of the box through the same whole where the video signal cable was installed. In order to preserve some kind of design, I decided to make a hole in the plastic part placed under the radio. There are several advantages doing this : you can easily hide the cable : nobody will see it from the outside, because you can hide it in the plastic part. You can also pull/push the cable when you install/remove your 7' inch monitor. Yes because I hope that you are not going to leave your monitor when you have your car parked somewhere !
12/ The result of the operation
13/ Kinda messy, but when it's finished 14/it looks pretty fine !
15/ Now plug the video cable. Turn on your iBook G4 and voilà ! Hum... almost !
16/ Don't forget to plug the FM Transmitter's jack into your audio output of your iBook and to tune your radio on 107.9Mhz (if you have an iTrip you can choose your frequency). Sometimes when you are driving with friends (one car following the other one) they can listen to your music : isn't it cool ??? ;-)
|
|
The final result : DVD playback |
| |
| Conclusion |
| |
Installing an entertainment system in your car is not very difficult. You always need to think mobile and as easy as possible: having a entertainment system may interest some burglars. In my opinion it wouldn't be wise to leave such an installation to the view of external persons. That's why I would recommend to take away the monitor ( e.g. place it in the back trunk), and once your are leaving your car you just need to take your iBook (or notebook) with you !
As you may have seen I haven't focused a lot on the graphical interface shown on the monitor. I will write an upcoming article on how to set up a computer to work in a car and which informations can be displayed on the monitor. Of course we will also check which softwares could be used in combination with our entertainment system.
|


 How to install an entertainment system